Subdocument
Overview
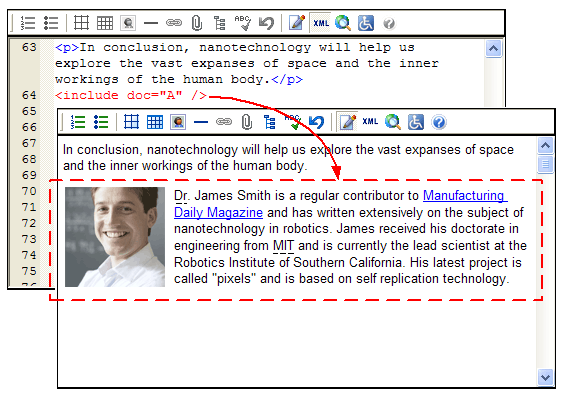
Subdocuments are chunks of reusable content that authors insert into documents as required. Subdocuments are essentially custom elements that act as placeholders for content stored outside the document, within the CMS. However, whereas placeholders appear in the document as icons, in lieu of content, subdocuments display the content itself inside the document. One example of a reusable subdocument is an author's biography that can be inserted at the end of a number of articles.

The Subdocument Web Service serves subdocuments to XStandard. XStandard then replaces custom elements with content from subdocuments and renders them in WYSIWYG mode as read-only content.
Requirements
- ASP / ASP.NET on Windows
- PHP 4.3.0+ on Linux / FreeBSD / Windows
ASP Installation
- Run the setup program called x-web-services-asp.exe Instructions for downloading this program are sent to you when you request download instructions for XStandard Pro.
- Set "Read & Execute" file permissions on C:\Program Files\XStandard Web Services to Everyone.
- Copy subdocument.asp, subdocument-example-A.txt, subdocument-example-B.txt, subdocument-example-C.txt, subdocument-example-D.txt, subdocument-example-E.txt to C:\InetPub\wwwroot (or another path that has an IIS virtual directory mapping) and set "Read & Write" file permissions on this folder to Everyone.
ASP.NET Installation
- Unzip the file called x-web-services-aspx.zip Instructions for downloading this file are sent to you when you request download instructions for XStandard Pro.
- Copy subdocument.aspx, subdocument-example-A.txt, subdocument-example-B.txt, subdocument-example-C.txt, subdocument-example-D.txt, subdocument-example-E.txt to C:\InetPub\wwwroot (or another path that has an IIS virtual directory mapping) and set "Read & Write" file permissions on this folder to Everyone. Into a sub-folder, copy the bin folder.
PHP Installation
- Unzip the file called x-web-services-php.zip Instructions for downloading this file are sent to you when you request download instructions for XStandard Pro.
- Copy subdocument.php, subdocument-example-A.txt, subdocument-example-B.txt, subdocument-example-C.txt, subdocument-example-D.txt, subdocument-example-E.txt to a folder on your Web site. Make sure this folder has the broadest possible permission settings. On Unix-based systems, set permissions to
0777.
Testing
In a Web browser, navigate to the URL where the Subdocument service is located. For example: http://localhost/subdocument.asp
If you don't see Status: Ready in the browser, the Web Service is not correctly installed. The most common cause of this is incorrectly set file permissions.
To set up XStandard to use the Directory service, modify the following <param> tag:
Property SubdocumentURL
(Available in XStandard Pro)
Absolute URL to a Subdocument Web Service. For testing purposes, the following URL is available:
http://soap.xstandard.com/subdocument.aspx
In subdocument.asp, subdocument.aspx or subdocument.php, search for "ADD CUSTOM CODE HERE". The following is an example from subdocument.aspx:
if(soap.Action == "doSubdocumentDescribe"){/*** -------------------------------------------------------** ADD CUSTOM CODE HERE** -------------------------------------------------------*/soap.AddSubdocumentDefinition("include", "doc");}
The AddSubdocumentDefinition() function is used to define custom elements that will act as subdocuments. The first argument is the custom element name. The second argument is the attribute that will contain the ID of the subdocument. Based on the previous example, the following custom element will act as a subdocument:
<include doc="A" />
The following code is used to replace custom elements with content:
else if(soap.Action == "doSubdocumentDownload"){string id = soap.GetProperty("id"); //id/*** -------------------------------------------------------** ADD CUSTOM CODE HERE** -------------------------------------------------------*/if (id == "A") {soap.SetSubdocument(soap.ReadFromFile(Server.MapPath("subdocument-example-A.txt")));}}
The if statement is used to check the subdocument ID and then the SetSubdocument() function is used to set the subdocument content from the given subdocument. In the example above, content for the subdocument is read from a file. You can customize this code to read from your CMS.
Notes
If subdocument content contains block elements (<p>, <table>, <ol>, <ul>, <dl>, <blockquote>, <h1> to <h6> and <address>), then the custom element that is used for the subdocument should be defined as a block element. This is done via the following <param> tag:
<param name="CustomBlockElements" value="include" />