Image Library & Attachment Library
Overview
- These services can be used for uploading files into a library on the server. The screen shot below shows XStandard uploading an image using the Image Library service.

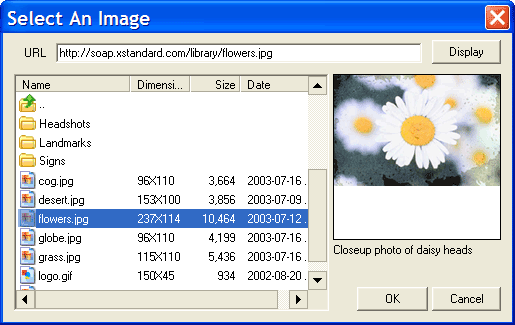
- These services also enable users to select files from a library on the server. The screen shot below shows XStandard browsing an image library using Image Library service.
Requirements
- ASP / ASP.NET on Windows
- PHP 4.3.0+ (with zlib module) on Linux / FreeBSD / Windows
ASP Installation
- Run the setup program called x-web-services-asp.exe Instructions for downloading this program are sent to you when you request download instructions for XStandard Pro.
- Set "Read & Execute" file permissions on C:\Program Files\XStandard Web Services to Everyone.
- Copy imagelibrary.asp, imagelibrary.config, attachmentlibrary.asp and attachmentlibrary.config to C:\InetPub\wwwroot (or another path that has an IIS virtual directory mapping) and set "Read & Write" file permissions on this folder to Everyone.
- Set "Read & Write" file permissions on C:\Temp to Everyone. This path can be changed in imagelibrary.asp and attachmentlibrary.asp files.
ASP.NET Installation
- Unzip the file called x-web-services-aspx.zip Instructions for downloading this file are sent to you when you request download instructions for XStandard Pro.
- Copy imagelibrary.asp, imagelibrary.config, attachmentlibrary.asp and attachmentlibrary.config to C:\InetPub\wwwroot (or another path that has an IIS virtual directory mapping) and set "Read & Write" file permissions on this folder to Everyone. Into a sub-folder, copy the bin folder.
- Set "Read & Write" file permissions on C:\Temp to Everyone. This path can be changed in imagelibrary.aspx and attachmentlibrary.aspx files.
PHP Installation
- Unzip the file called x-web-services-php.zip Instructions for downloading this file are sent to you when you request download instructions for XStandard Pro.
- Copy imagelibrary.php, imagelibrary.config, attachmentlibrary.php and attachmentlibrary.config to a folder on your Web site. Create a sub-folder called temp or modify the PHP script to point to an alternate folder for storing temporary work files. Make sure these folders have the broadest possible permission settings. On Unix-based systems, set permissions to
0777.
Testing
In a Web browser, navigate to the URL where the ImageLibrary or AttachmentLibrary service is located. For example: http://localhost/imagelibrary.asp
If you don't see Status: Ready in the browser, the Web Service is not correctly installed. The most common cause of this is incorrectly set file permissions.
To set up XStandard to use the ImageLibrary and AttachmentLibrary services, modify the following <param> tags:
Property ImageLibraryURL
(Available in XStandard Pro)
Absolute URL to an Image Library Web Service. Multiple URLs can be specified, separated by a space character. For testing purposes, the following URL is available: http://soap.xstandard.com/imagelibrary.aspx
Property AttachmentLibraryURL
(Available in XStandard Pro)
Absolute URL to an Attachment Library Web Service. Multiple URLs can be specified, separated by a space character. For testing purposes, the following URL is available:
http://soap.xstandard.com/attachmentlibrary.aspx
Property LinkLibraryURL
(Available in XStandard Pro)
Absolute URL to a Link Library Web Service. Multiple URLs can be specified, separated by a space character. For testing purposes, the following URL is available:
http://soap.xstandard.com/linklibrary.aspx
Customization
The following are settings in imagelibrary.aspx file. The PHP and ASP versions of this and other services have similar settings.
- The root folder where uploaded images should be saved.
string libraryFolder = Server.MapPath("."); - The Base URL created for files. This can be a relative or an absolute URL.
string baseURL = "images/";
Thus, if you upload a file called "file.png" with the above setting, the src for the file will be:
<img src="images/file.png" ... /> - Path to config file.
string configFile = Server.MapPath("imagelibrary.config"); - Temp folder for storing received packets. Make sure file permissions are set to Read/Write for Everyone on this folder.
string tempFolder = @"C:\Temp\"; - A list of accepted file extensions.
string acceptedFileTypes = "gif jpeg jpg png bmp"; - Maximum file upload size in bytes.
long maxUploadSize = 512000; - Provide date the file was last modified. For large libraries, turning this off can improve performance.
bool getDateLastModified = true; - Provide file size. For large libraries, turning this off can improve performance.
bool getFileSize = true; - Provide image dimensions. For large libraries, turning this off can improve performance.
bool getImageDimensions = true; - Enable browsing of the library.
bool libraryBrowseEnabled = true; - Enable searching of the library. You will need to customize the Search feature to meet your CMS needs.
bool librarySearchEnabled = false;
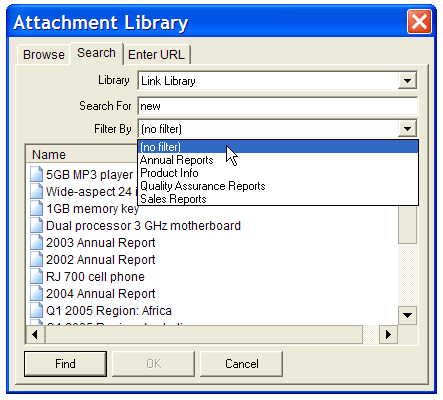
When the Search feature setting is true, the editor displays a Search tab similar to that seen in the screenshot below.
- Enable uploading of files to the root folder.
bool libraryUploadToRootContainerEnabled = true; - Enable uploading of files to sub-folders.
bool libraryUploadToSubContainerEnabled = false;
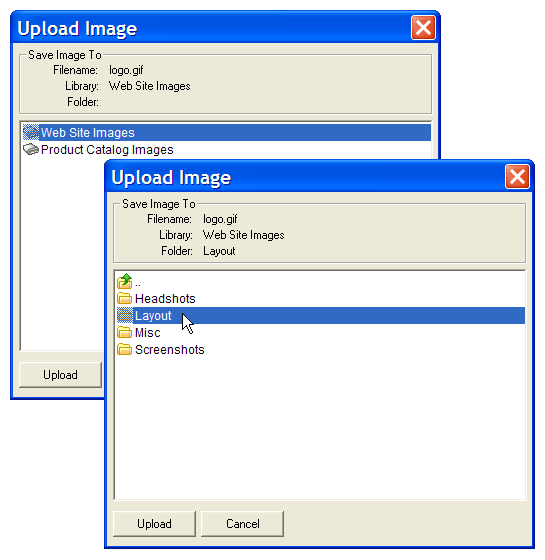
When the sub-folder setting is true, uploaded files can be saved to sub-folders, as shown in the screenshot below.
- Enable users to replace existing files with uploaded files.
bool libraryUploadReplaceEnabled = true;
When set to false, the ability to replace existing files with uploaded files is disabled:
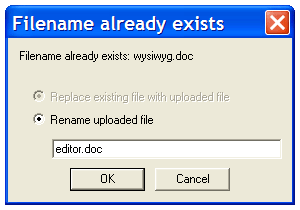
Image Library Config File
The purpose of imagelibrary.config is it to provide metadata for the image library. Below is an example of an imagelibrary.config file. The name of the library is specified in the <name> tag. The <library> tag can contain multiple <folder> and <image> definitions. Each folder and image is indentified by the <path> tag. This is a relative, physical path to the folder or image from the root of the library. For example: images/headshots/smith.jpg Note: use / as a path separator and ensure that the path does not start or end with /. The <label> tag can contain a friendly label for the file or image. Custom icons can be assigned to each folder or image via the <icon> tag. This can be the ID of an icon defined in the icons.xml file. A CSS class can be assigned to an image via the <class> tag. An image can also be identified as decorative or informative via the <decorative> tag. If the value is no, values from <alt>, <title> and <longdesc> are used in generating the image markup.
- <library>
- <name>Image Library</name>
- <folder>
- <path>productphotos</path>
- <label>Product Photos</label>
- <icon></icon>
- <hidden>no</hidden>
- </folder>
- <image>
- <path>file.png</path>
- <label></label>
- <decorative>no</decorative>
- <alt>Alt goes here</alt>
- <title>Title text goes here</title>
- <longdesc>http://myserver/longdesc.htm</longdesc>
- <class></class>
- <icon></icon>
- <hidden>no</hidden>
- </image>
- </library>
Attachment Library Config File
The purpose of attachmentlibrary.config is it to provide metadata for the attachment library. Below is an example of an attachmentlibrary.config file. The name of the library is specified in the <name> tag. The <library> tag can contain multiple <folder> and <attachment> definitions. Each folder and attachment is indentified by the <path> tag. This is a relative, physical path to the folder or file from the root of the library. For example: docs/reports/Q1sales.pdf Note: use / as a path separator and ensure that the path does not start or end with /. The <label> tag can contain a friendly label for the folder or file. Custom icons can be assigned to each folder or file via the <icon> tag. This can be the ID of an icon defined in the icons.xml file. A CSS class can be assigned to an attachment via the <class> tag. The <newWindow> tag can be used to generate markup that will open the hyperlinked attachment in a new window.
- <library>
- <name>Attachment Library</name>
- <folder>
- <path>salesreports</path>
- <label>Sales Reports</label>
- <icon></icon>
- <hidden>no</hidden>
- </folder>
- <attachment>
- <path>file.doc</path>
- <label></label>
- <newWindow>no</newWindow>
- <class></class>
- <icon></icon>
- <hidden>no</hidden>
- </attachment>
- </library>